Efficient customer feedback with Zoho Desk: Customised and automated

Introduction
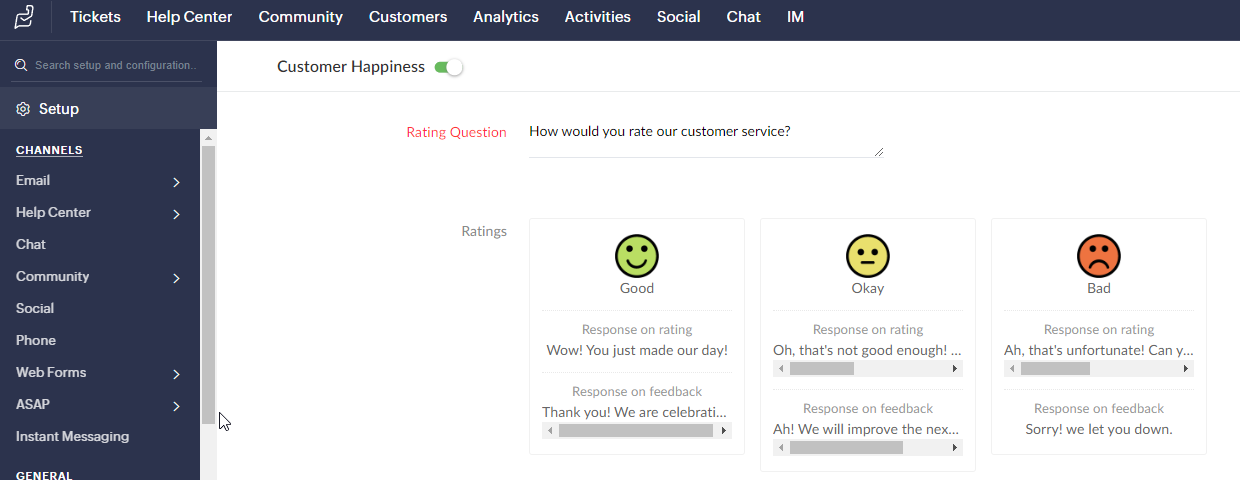
Zoho Desk offers a basic customer review feature, but its limitations show its weaknesses. The standard customisation options are severely limited, and the default page and email elements leave little room for customisation. In this post, I’ll show you an way to get the most out of your customer reviews with Zoho Survey and Zoho Analytics.
The standard feature
Rigidity and inflexibility
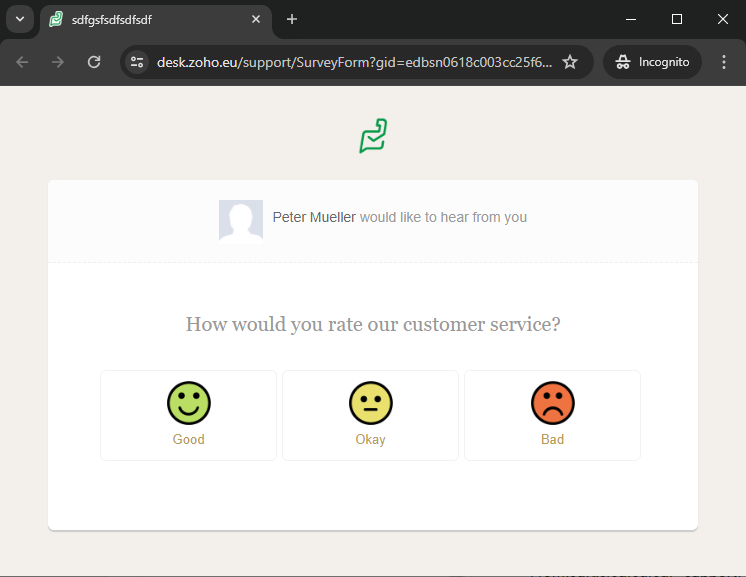
The native feature allows hardly any customisation. Neither the rating page nor the elements in the emails can be customised.

Unnecessary default email notifications
The option to only send rating requests when tickets are closed requires the activation of a standard email notification. Unfortunately, this results in the email being sent every time the ticket status changes, which is often undesirable and leaves little room for customisation.
Restriction of the data to be queried
The standard rating scale is limited to Good, Average and Bad. This may be sufficient for some, but those who want more insights or categories will quickly reach the limits of the standard feature.
Your path to a customised solution
Evade rigidity with Zoho Survey
Use Zoho Survey as a powerful tool for customised surveys. This is where you can get creative and take full advantage of the freedom of customisation.
Connect Zoho Survey with Zoho Desk
Seamlessly integrate Zoho Survey with Zoho Desk and customise workflows according to your preferences. Send targeted evaluation requests to your contacts at the optimal time and in the way you choose.
Analyse with Zoho Analytics
Gain deep insights into the collected data by using Zoho Analytics. Create meaningful reports and statistics to optimise your customer service management.
The benefits of your customised approach
Flexibility and professionalism
Thanks to your customised solution, you determine the aesthetics of the review page and email elements yourself. Avoid compromises and the unprofessional impression of the standard feature.
Targeted notifications and reporting
Thanks to Zoho Survey and Zoho Analytics, you can set up targeted notifications and use comprehensive reporting functions that go beyond the limited possibilities of the standard feature.
Time savings and efficiency
Although setting up the standard feature requires minimal effort, your customised approach offers long-term benefits. The initial investment in customisation pays off through optimised customer ratings and detailed analyses.
1. Survey
The basis is of course the survey, which is realised using the Zoho Survey App. This application offers numerous functions, even if it may seem somewhat extensive. In this guide, I will limit myself to the essentials for demonstration purposes, although you can make the survey more complex if you wish.
Linking the survey with Zoho Desk
In order to be able to assign the completed survey to the corresponding ticket in Zoho Desk in Zoho Analytics at the end, it is necessary to save the ticket ID in the survey. This allows us to establish the relationship retrospectively. Optionally, further ticket data can be stored in the survey. It is advisable to do this, for example, if information such as the ticket owner’s user ID is to be saved in order to be able to track the status of the data at the time of the evaluation. As the ticket owner may change after the survey request has been sent and completed/submitted, it may be advisable to save this information if the survey is to be assigned to a specific person.
In Zoho Survey, it is possible to use URL parameters to transmit certain data directly when creating the survey links. This allows us to add relevant information to the survey before the user completes it.
Configure ticket ID as URL parameter
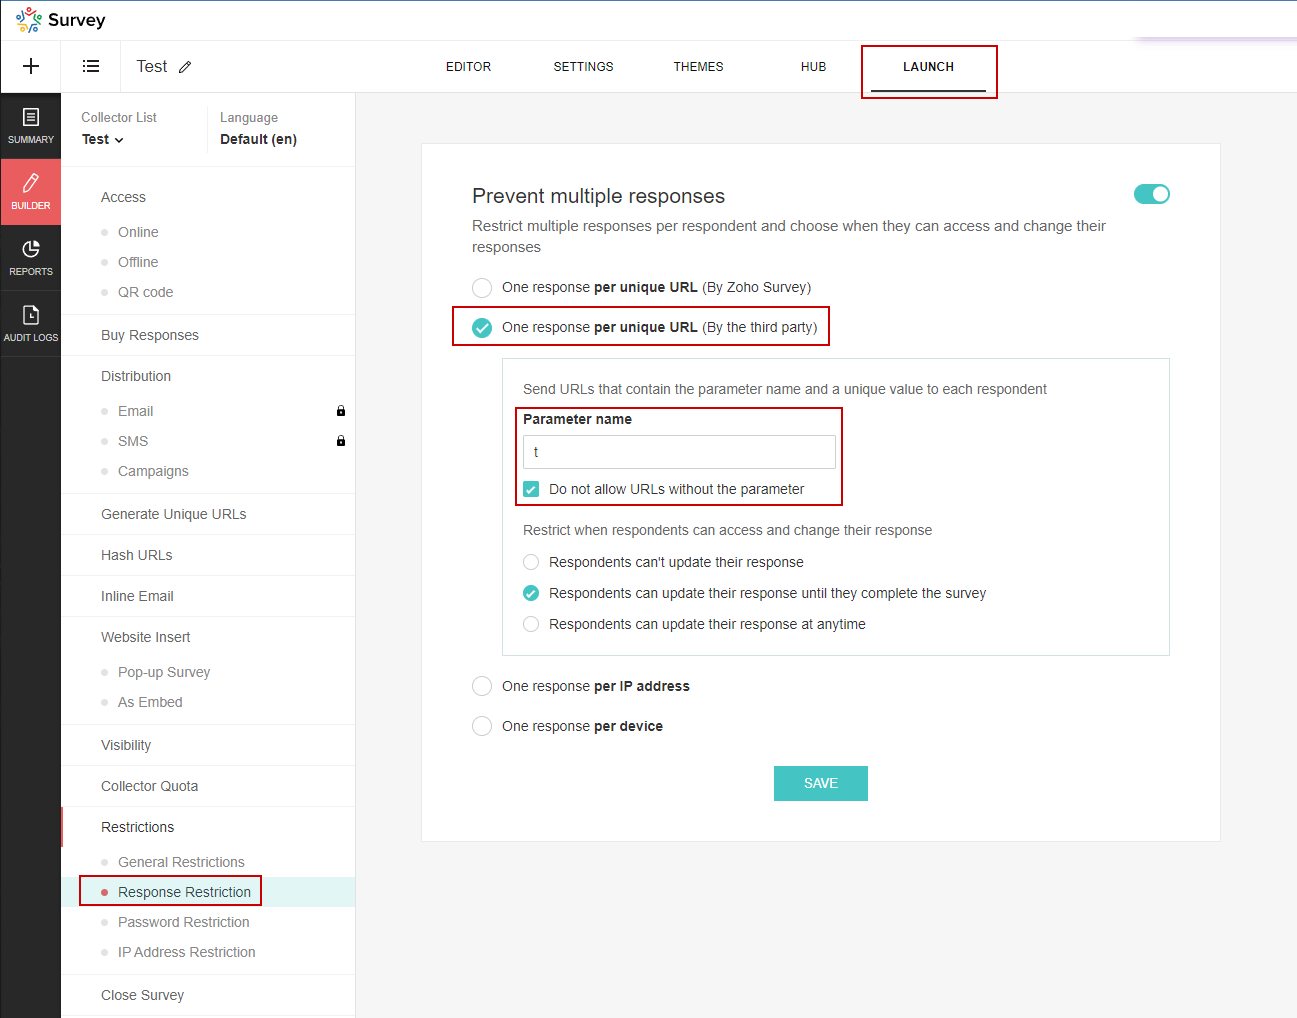
These parameters can be created in the editor under Advanced options. If you want to save further information, create the corresponding parameters here. In the ticket ID example, however, we use a different feature, as we also want to ensure that the URL parameter must be a mandatory part of the URL. If the information is not present, the URL is invalid and the survey should not be able to be carried out. We can achieve this with a restriction option in the “Publish” tab. Navigate to Restrictions and open the menu item Response Restriction.
- Activate the option
One response per unique URL (From third party provider). Parameter Name: Enter the name of the parameter you use for the ticket IDs here. In this example I usetid.- Activate the option
Do not allow URLs without parameters.
Set according to your preferences whether the survey may not be edited at all, only after submission or always. It is advisable to block editing after submission to ensure meaningful statistics.
Structure of the sample survey
The sample survey consists of five evaluation sections as well as additional questions to concretise negative feedback. There is a general comments field at the end.
The question type rating scale is used for the ratings. The question comprises a scale from +2 (very good) to -2 (very poor). Alternatively, the Likert scale can be used, but this does not support negative values. The weighted selection method is used here for evaluation in order to enable an intuitive distinction to be made directly between positive, neutral and negative ratings. All evaluation questions are marked as mandatory fields.
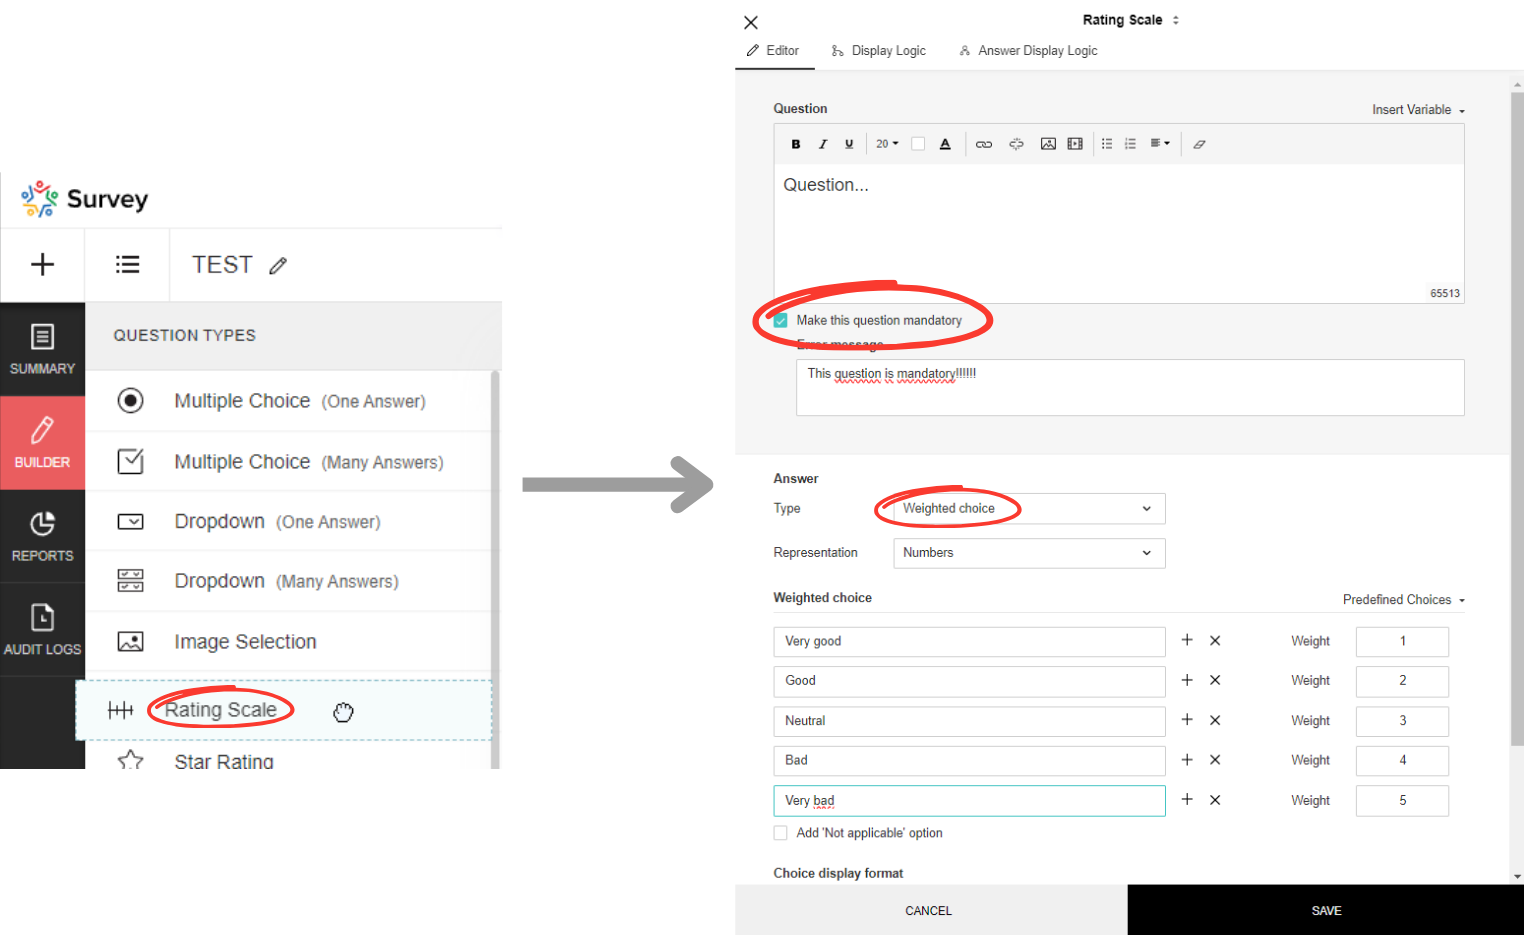
The concretisation questions are configured as long answer questions and are only displayed for negative ratings. The display logic must be adapted accordingly by defining a criterion that forces the display of the concretisation questions from a bad rating. These questions are also declared as mandatory fields.
In the first step, select the higher-level evaluation question and use none of the following as the operator. Then select the answers for which the concretisation question should not be displayed.

Zoho Survey automatically takes into account the display status at the time of completion. A mandatory field that is not displayed cannot be completed by the user. Although empty mandatory fields exist, the survey can be completed.
Rating scale:
How would you rate the speed with which your ticket was processed?
- Very fast
- Fast
- Reasonable
- Slow
- Very slow
Concretisation (long answer / text field):
Can you please explain in more detail the reasons that led you to give this rating for “speed”?
Rating scale:
To what extent did you feel understood and supported by our support team?
- Very well understood and supported
- Understood and supported
- Neutral
- Not fully understood and supported
- Not understood and supported at all
Concretisation (long answer / text field):
Can you please explain in more detail the reasons that led you to give this rating regarding “understanding and support”?
Rating scale:
Please rate the overall competence and effectiveness of our support team.
- Very competent and effective
- Competent and effective
- Average
- Less competent and effective
- Not at all competent and effective
Concretisation (long answer / text field):
Can you please explain in more detail the reasons that led you to give this rating for “overall competence and effectiveness”?
Rating scale:
How satisfied are you with the solution or response provided to you regarding your concern?
- Very satisfied
- Satisfied
- Neutral
- Dissatisfied
- Very dissatisfied
Concretisation (long answer / text field):
Can you please explain in more detail the reasons that led you to give this rating for “Solution or response”?
Rating scale:
How likely is it that you would recommend our support service to friends or colleagues?
- Very likely
- Likely
- Undecided
- Unlikely
- Very unlikely
Concretisation (long answer / text field):
Can you please explain in more detail what reasons led you to give this rating regarding “Recommendation”?
Final comments (long answer / text field):
Do you have any suggestions for improvement or ideas on how we could further develop our support service?
Essential settings
After you have completed the survey, the following settings must be made.
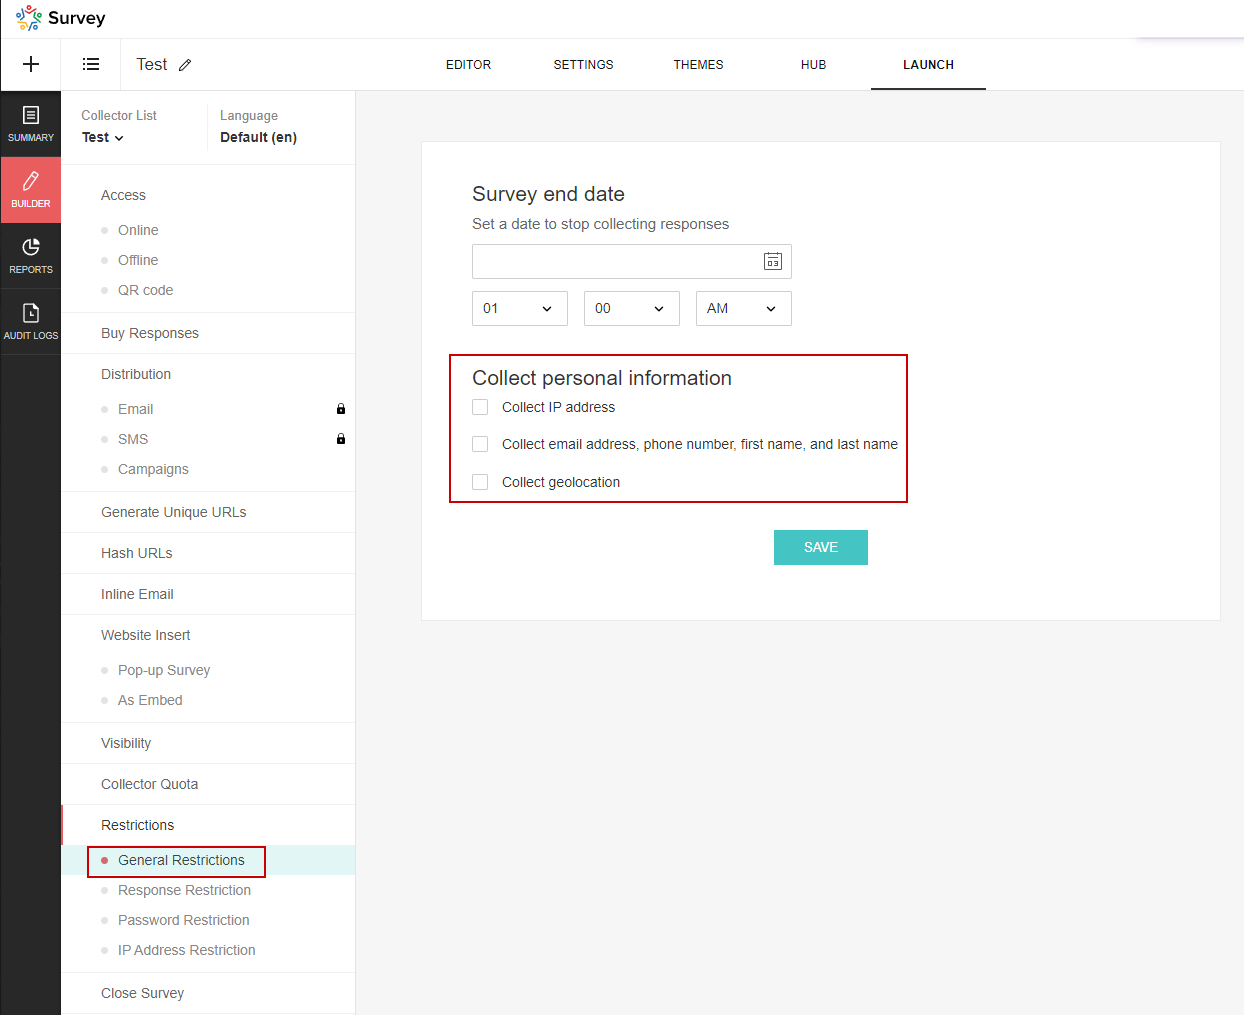
GDPR
Navigate to the general restrictions and switch off all options under Collect personal information.
Prevent manipulation
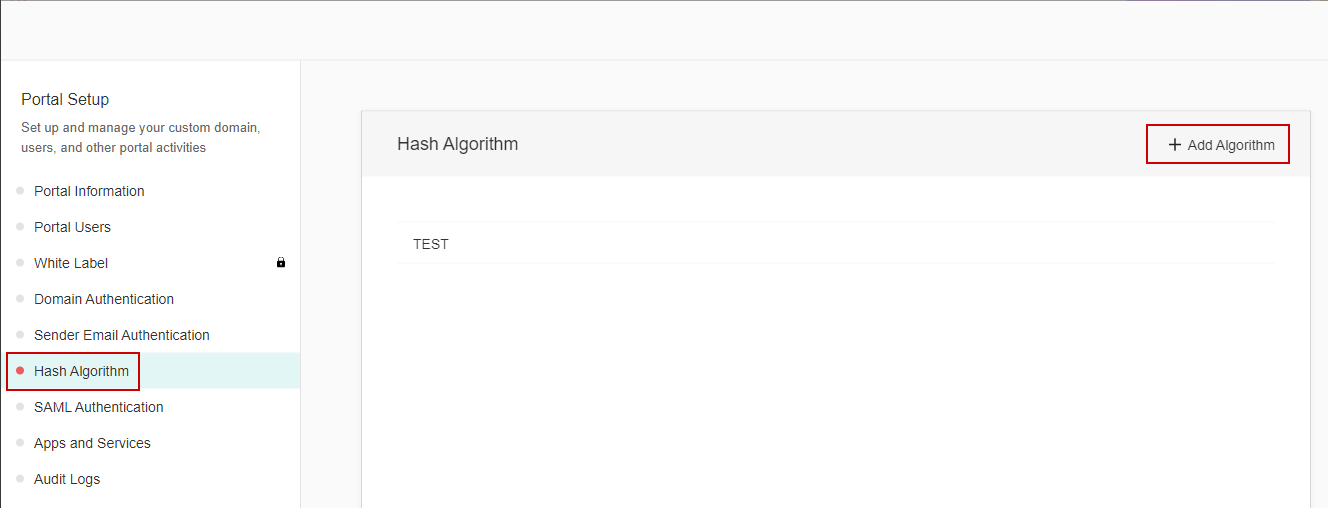
To ensure that tech-savvy survey recipients can’t simply try out ticket IDs and submit ratings for tickets they never submitted themselves, we use Zoho Survey’s hash functionality. To do this, we create a new hash option in the global app settings of Survey. Navigate to the corresponding page (profile picture top right 🡆 Portal Settings 🡆 Hash Algorithm), assign a name, select the desired algorithm (SHA-1, SHA-256 and SHA-512 are available) and the secret.
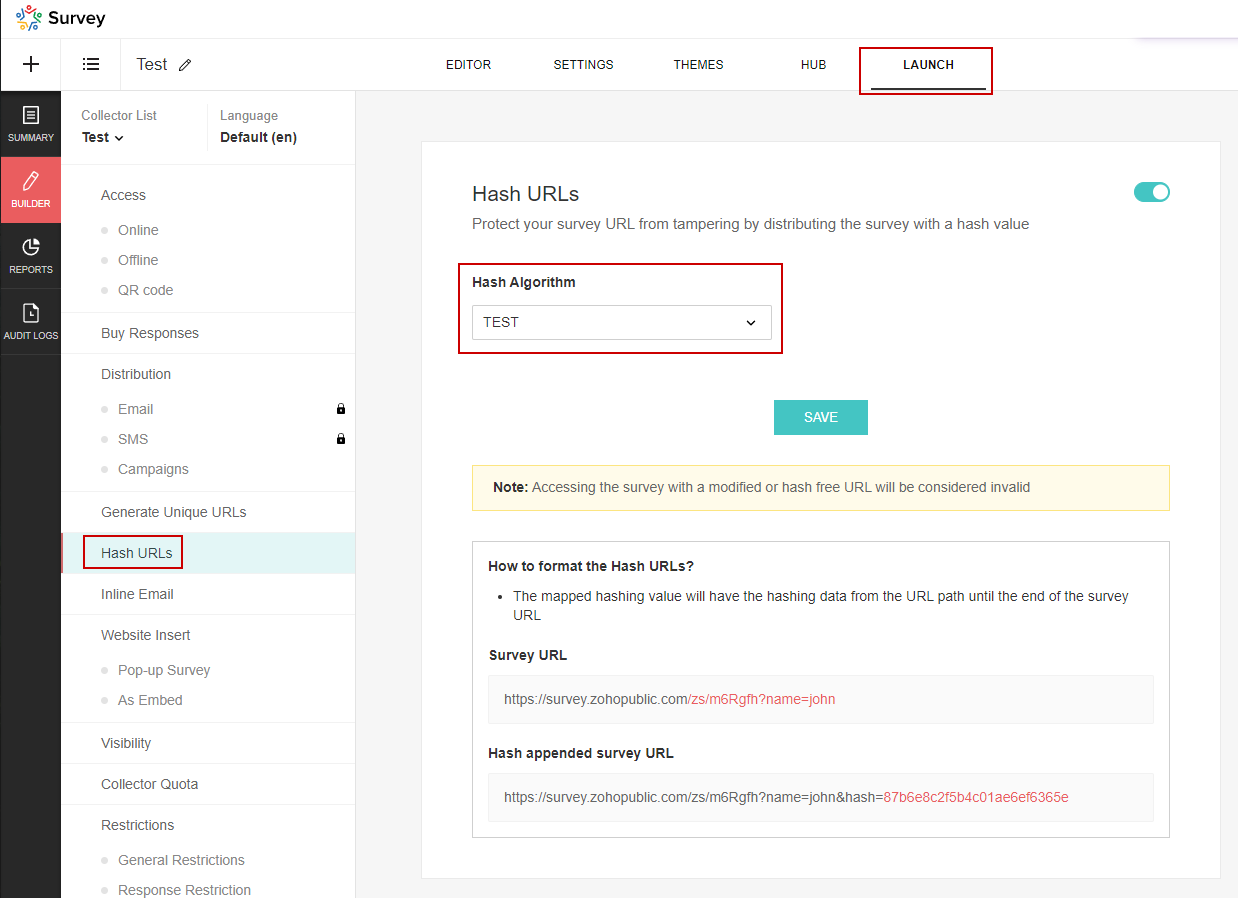
The hash options created here can then be selected in the survey settings.
Both the HMAC-SHA512 and HMAC-SHA256 algorithms are available in Zoho Deluge. In this context, the choice between the two options is rather irrelevant, as it is not a matter of particularly high security requirements. I use SHA256 in these instructions.
The survey link is made up of various components:
baseUrl + String "zs" + Survey-ID + URL-Parameter
Example: https://survey.zohopublic.com/zs/abc123?t=000000000000000001
The hash is calculated using zs + query ID + URL parameter, whereby the previously configured key/secret key is used.
The following string would be used in the example:
/zs/abc123?tid=000000000000000001
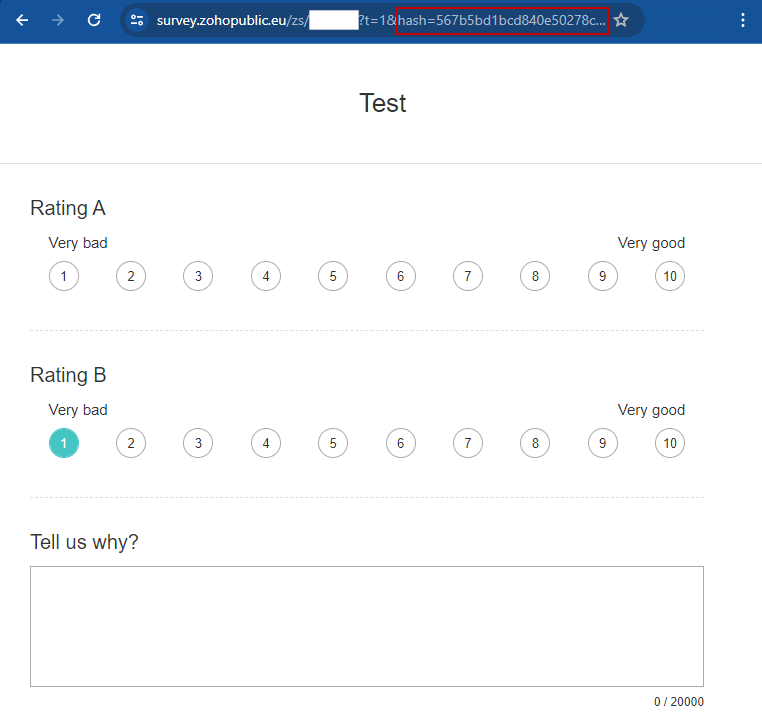
The resulting hash is then appended to the link as the last parameter.
Example: https://survey.zohopublic.com/zs/abc123?tid=000000000000000001&hash=x
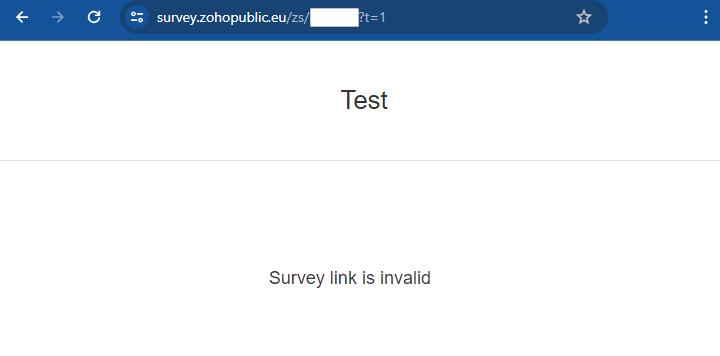
If the hash value in the URL is missing or incorrect, access to the survey is denied. However, as soon as a valid hash value is recognised, access is available without any problems.
Write data to desk
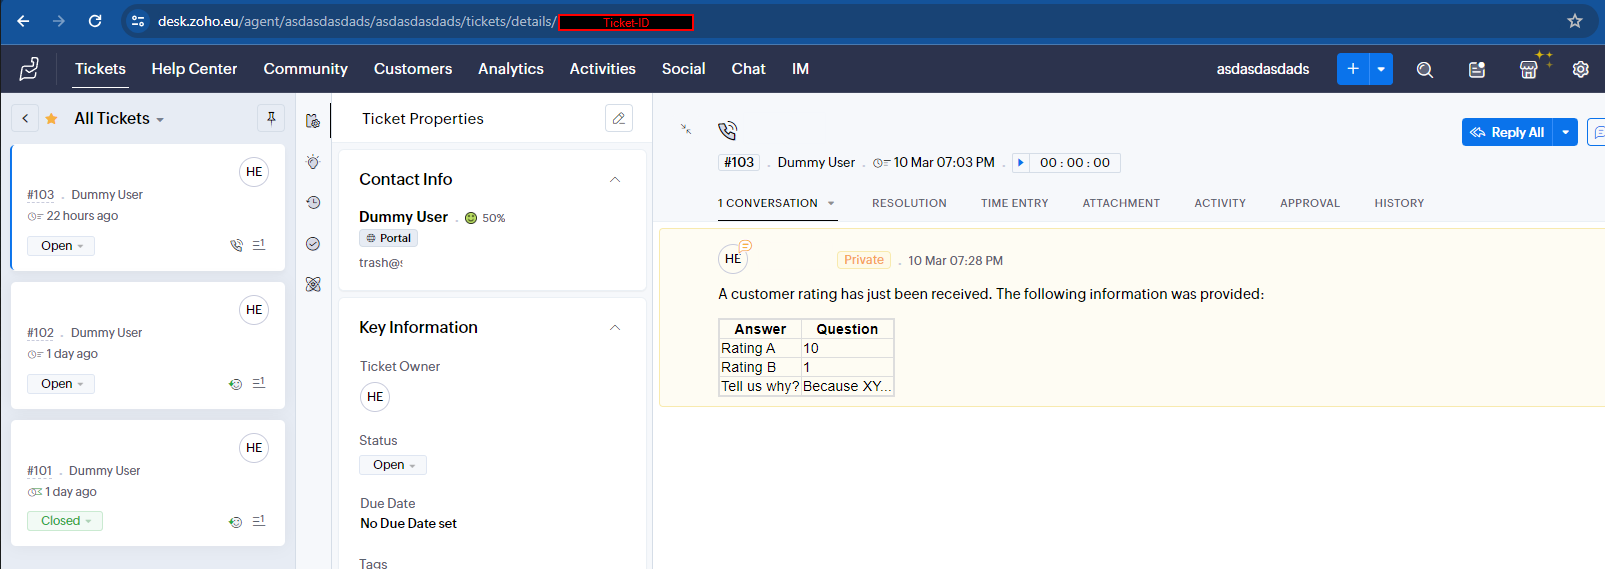
We have successfully completed the configuration of our survey. However, before we continue directly with Desk, I would like to implement a small automatism. This ensures that a comment is automatically created after each rating, which informs about the receipt of the rating. In addition, I would like to save the average rating in a ticket field in Zoho Desk. This makes it possible to search, filter and create views directly in Desk. This way we get a quick overview of bad tickets, for example. For detailed analyses, we will continue to use Zoho Analytics, but this central information is extremely useful in Desk.
Create field in Zoho Desk
To be able to store the average value in the ticket, we create a new float field. Navigate to Zoho Desk and open Settings 🡆 Customisation 🡆 Layout and Fields. Select any ticket layout and add a new decimal field. Remember the API name! You can then return to Zoho Survey.

Create function in Zoho Survey
Open the edit mode of the survey and navigate to the Integrations tab and go to the Triggers section. Here you can create a new function.
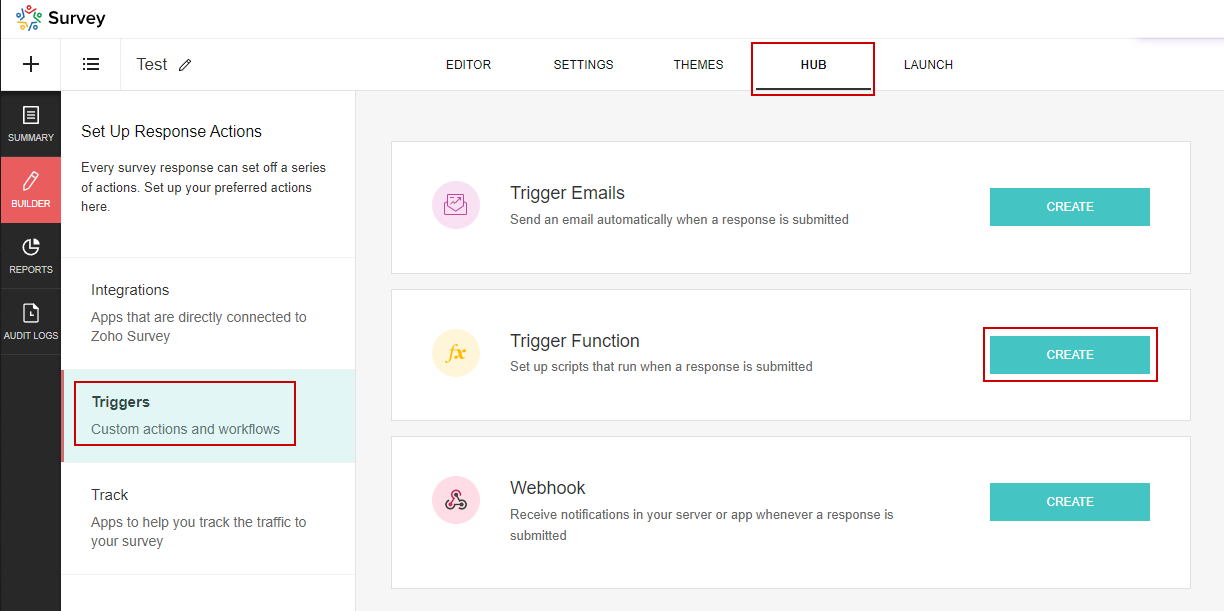
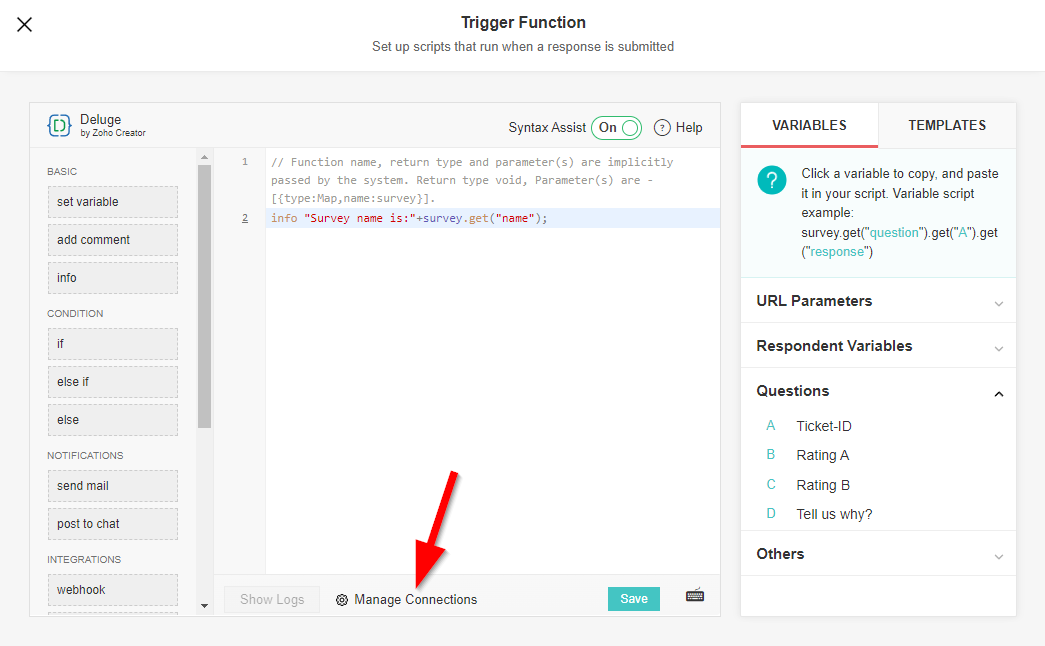
To be able to interact with Zoho Desk and the corresponding API, an authenticated connection is required. For this we can use so-called Connections, which must be created first. To do this, go to the bottom area and click on ‘Manage Connections’. Create a new connection, select Zoho OAuth as the service, name the connection and add the scope Desk.tickets.UPDATE. Further scopes are not required in this case.
🔗 Paste this code (link leads to GitHub)!
In the next step, update the following values within the function (within the settings map):
zohoDeskApiBaseUrl: Change the TLD according to the desired data centre.zohoDeskConnectionName: Enter the name of the previously created connection.ticketIdUrlParamName: Enter the name of the URL parameter you have created.- In this example it is
tid
- In this example it is
zohoDeskCustomFieldName: Enter the API name of the custom field you added to the ticket layout in Zoho Desk.commentIsPublic: Choose between “True” and “False”. If “True”, the comment is also visible in the customer portal for all end users!commentContentPrefix: Insert any HTML that is used for the comment on the ticket.tableHeaderTextKey: Enter the column name for the questions that will be used in the comment in the table.tableHeaderTextValue: Enter the column name for the answer that is used in the comment in the table.sendMailOnErrors: Choose between “True” and “False”.emailRecipients: Enter one or more e-mail addresses here (separated by commas) to which error messages are to be sent.
Testing the custom function
-
Select a ticket in Zoho Desk that you want to use for a test. Create it if necessary and note the ticket ID from the URL. The ID is located at the end of the ticket details URL and consists of 18 characters.
-
Copy the survey link, in this example we use the dummy URL for demonstration purposes
https://survey.zohopublic.eu/zs/xxxxxx. -
Now add the parameter
tidand assign the ticket ID to it. The resulting URL then looks like this:https://survey.zohopublic.eu/zs/xxxxxx?t=000000000000000001 -
Access is still being denied at this point - we still need to generate the hash value. To do this, use an online tool to calculate the hash value using your secret. You have configured this secret in the global survey settings. To calculate the hash value (for test purposes only), you can use this online tool https://www.devglan.com/online-tools/hmac-sha256-online. Note that I am not in contact with the creator of this tool and this is not an advert; I just found it via Google and think it’s handy.
-
Hash the following part of the URL:
/zs/xxxxxx?t=000000000000000001 -
The complete URL is then as follows:
https://survey.zohopublic.eu/zs/xxxxxx?t=000000000000000001&hash=fca17330081eaf25a6a65d5d1ce4f723f9f02b2559064fb5457da73e63c53e02 -
Once the URL has been correctly compiled, open it. Fill out the survey and submit it. Then check your ticket; the custom field should contain the average rating and a comment should have been added.
2. Automatically send survey in Desk
By using a workflow and a customised function, we ensure that an email with the survey link is automatically sent to the contact in Zoho Desk as soon as the ticket has been successfully resolved. Here, the triggering factor plays a minor role and can be configured according to individual needs. It is crucial to create a function that creates the URL and sends the email.
E-Mail-Template
To ask the contact to submit a review, we create an email template under Settings 🡆 Personalisation 🡆 Templates. Select the Tickets module and design the email according to your requirements. Only the message and the subject are relevant in the template. The sender email must be specified manually in the function.
Make sure to insert a placeholder in your email text, which will be replaced by the survey link when the email is sent. Use the string {SurveyUrl} for this. You can also use all standard placeholders, as these will be replaced correctly.
Example template:
<p>
  Hello ${Cases.Contact Name},
</p>
<p>
  We hope that your request has been successfully resolved. In order to continuously improve our service quality, we would appreciate your feedback.
</p>
<p>
  Please take a moment to participate in our short survey. Your feedback is important to us!
</p>
<div>
  <a href="{SurveyUrl}" target="_blank">Start survey!</a>
  <br>
</div>
<p>
  Thank you in advance!
  <br>
</p>
<p>
  Regards,
  <br>
</p>
<p>
  Your ${Organization.Organization Name} support team
</p>
After you have created the template, please make a note of the ID, as we will need it later in the function. You will find this ID in the URL when you open a template.
Function
Create function
In order to create the actual function, we must first create a connection, similar to Zoho Survey. To do this, navigate to Settings 🡆 Developer Area 🡆 Connections and create a new connection.
- Select “Zoho Desk” as the service
- Assign a name
- Select the following scopes:
- Desk.tickets.UPDATE
- Desk.settings.READ
Navigate to Settings 🡆 Developer Area 🡆 Functions and create a new function for the module Tickets. Insert this code.
🔗 Paste this code (link leads to GitHub)!
In the next step, update the following values within the function (in the settings map):
zohoDeskApiBaseUrl: Adjust the TLD according to the desired data centre.zohoDeskConnectionName: Enter the name of the previously created connection.surveyBaseUrl: Enter the public link to your survey here.surveyUrlParamName: Enter the name of the URL parameter for the ticket ID that you have configured in Survey. In this example it istid.mailFromAddress: Enter the email address from which you want to send the emails. Make sure that the email exists and is active under Settings 🡆 Channels 🡆 Email 🡆 Sending addresses.surveyUrlPlaceholder: Here you insert the placeholder that you used in your email template. In our example it was:{SurveyUrl}.sendMailOnErrors: Choose between “True” and “False”.emailRecipients: Add one or more email addresses here (separated by commas) to which error messages should be sent.
Change the value of the variable hashKey in the section Vars. Enter the value that you have configured in Zoho Survey under Portal Settings 🡆 Hash Algorithms and stored in the survey. This value is not in the settings map, as the values stored there are sent to the configured recipients in the email in the event of an error.
In the Send mail section of the surveyParams list, add all the required parameters according to the data you want to transfer from Zoho Desk to Zoho Survey. In this example, only the ticket ID will be transferred, but you are free to transfer additional content from Desk to Survey to optimise the data at the time of assessment.
Testing the function
- Click on the
Save & Executebutton. - Enter test values for the parameters and click on
Execute.
Once the process is complete, you should see an email in the ticket that has been sent to the email address you entered. Then try clicking on the link provided - it should redirect you to the survey page if everything worked correctly.
Workflow
Set up a workflow
- Go to “Settings 🡆 Automation 🡆 Workflows 🡆 Rules” and create a new workflow for the ticket module.
- Activate the “Field updates” option and select the “Status” field.
- Set the following criteria:
- Status is closed (it should only be executed when the ticket changes to a status that is defined as closed).
- “Customised field for average rating” is empty (an email should only be sent if the customer has not yet submitted a rating).
- In the last step, link the previously created function to the workflow.
- Save the settings.
And you’re done with the configuration in Zoho Desk!
Testing the workflow
To test the workflow, simply open a ticket and close it. The workflow should only be executed if the user-defined field for saving the average rating is empty. Try out both cases!
3. Evaluating data in Zoho Analytics
Zoho Desk Sync
Make sure you synchronise Zoho Desk data with Zoho Analytics. If you haven’t enabled this yet, open Zoho Desk.
- Navigate to Settings 🡆 Marketplace 🡆 Zoho 🡆 Zoho Analytics.
- Open the settings and add the tables and columns you need.
- Configure the synchronisation interval.
- Save the changes you have made.
Zoho Survey Sync
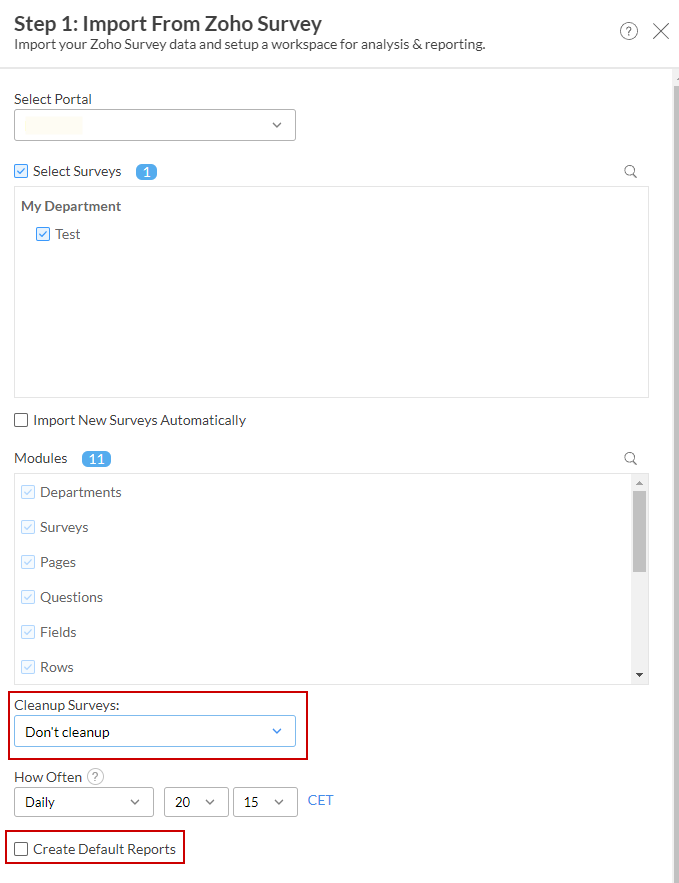
Make sure you synchronise Zoho Survey data with Zoho Analytics (in your Desk Workspace). If this is not yet enabled, open Zoho Analytics.
- Navigate to your Zoho Desk Workspace.
- Click on “Create” and select “New Table / Import Data”.
- Search for “Zoho Survey” service and select it.
- Customise the settings according to your requirements.
- Select all modules.
- Make sure that you do not select an option for “Clean surveys” to prevent old data from being deleted.
- You can leave the default reports activated, but I don’t think they make much sense and could clutter up your workspace unnecessarily. So choose wisely.
Zoho Survey tables / structure
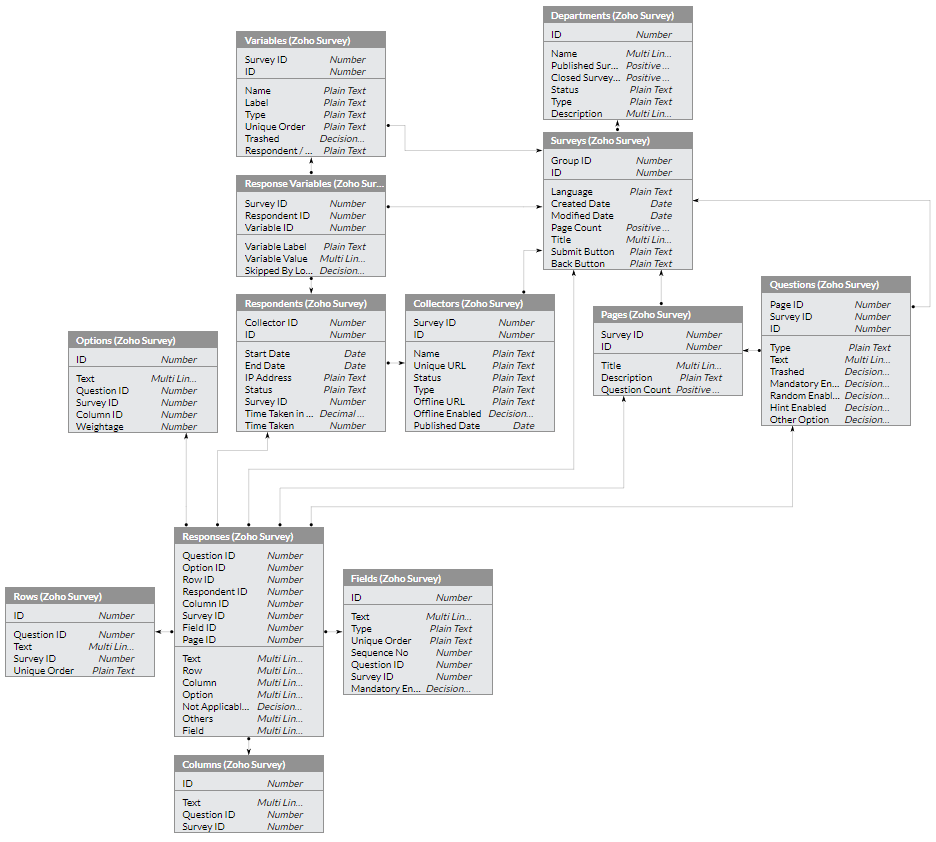
Once synchronisation is complete, you will have numerous new tables at your disposal. In the following, we will create a short query together and create graphical analyses.
If you want to create your own SQL queries, you can find helpful information in my blog post about the data structure of Zoho Survey in Zoho Analytics.
Example query
SELECT
		 to_decision_box(if(res."Option"  IS NULL, 0, 1)) isNumberRating,
		 rdt."End Date" surveySentOn,
		 q."Text" question,
		 res."Option" selectedRatingOption,
		 o."Weightage" ratingValue,
		 res."Text" textFieldContent,
		 t."Request Id" ticketNumber,
		 tOwner."Name" ticketOwner,
		 t."Subject" ticketSubject,
		 con."Full Name" ticketContact,
		 acc."Account Name" ticketContactCompany,
		 'https://desk.zoho.<tld>/agent/<orgName>/' + replace(lower_case(t."Department"), ' ', '-') + '/tickets/details/' + resVar."Variable Value" ticketWebLink
FROM  "Respondents" rdt
INNER JOIN "Responses" res ON res."Respondent ID"  = rdt."ID"
INNER JOIN "Response Variables" resVar ON resVar."Respondent ID"  = rdt."ID"
INNER JOIN "Questions" q ON q."ID"  = res."Question ID"
INNER JOIN "Tickets (Zoho Desk)" t ON t."ID"  = resVar."Variable Value"
LEFT JOIN "Agents (Zoho Desk)" tOwner ON tOwner."ID"  = t."Ticket Owner"
INNER JOIN "Contacts (Zoho Desk)" con ON con."ID"  = t."Contact ID"
LEFT JOIN "Accounts (Zoho Desk)" acc ON acc."ID"  = con."Account ID"
LEFT JOIN "Options" o ON o."ID"  = res."Option ID"
WHERE	 rdt."Survey ID"  = 000000000000000000
 AND	rdt."Status"  = 'completed'
Some adjustments must be made in the query. The TLD and the name of the organisation or portal must be adjusted for the compilation of the URL for the detailed view of the corresponding tickets in Zoho Desk:
'https://desk.zoho.<tld>/agent/<orgName>/' + replace(lower_case(t."Department"), ' ', '-') + '/tickets/details/' + resVar."Variable Value" ticketWebLink
The ID of the satisfaction survey must be inserted in the WHERE condition:
WHERE rdt."Survey ID" = 000000000000000000
After you have made the adjustments, save the query and switch to view mode. To ensure that the link is clickable, change the data type of the column to URL.
You can now create numerous analyses based on this query and combine them on a dashboard if necessary.
Hint
For example, if you want to find out the average rating of the individual categories using a bar chart, you will realise that the questions are quite long. In the following, I will explain how you can use abbreviations using a simple method.
Open the Questions table and filter as follows:
Survey ID= ID of your customer satisfaction surveyTrashed= No
Download the result as a CSV file. Only select the columns ID and Text. Open the file and change the long texts to shorter ones. Then import the table again:
- Click on Create
- Switch to `Files
- Assign a name and description
- Upload the previously created / edited CSV file
- Rename the first column to
Question IDand setNumberas the data type - Create a link
It is then necessary to create a link between our new table and the Zoho Survey table. A LEFT join is recommended as data may not be present if data maintenance is neglected.
LEFT JOIN "Survey Question Labels" qAbbrev ON qAbbrev."Question ID" = q."ID"
Now simply add the column and you’re done.
qAbbrev."Text" questionAbbrevation
When creating a chart, we can now select the new column and use the shorter text. New questions that are added to the survey must of course also be entered in the table. On the other hand, it is possible to change the text at any time without having to adapt the query.
